If no menu
or buttons show
ensure you have
scripting enabled
Please give time
for menu to load


|
|
A little
bit of judicious smoothing.
|
This is mentioned
to compliment my video
on reassembly - basic tho it is. In
the reassembly video I put the recoil assembly
back into place with no use of channel locks,
barrel in place - just done by hand with some
jiggling and minor cussing!
I have done a very subtle modification to
two components - which IMO can make that proceedure
just a tad easier. Let me stress right now
- it is NOT Rohrbaugh approved - tho
having said that I cannot believe for one
moment it would be frowned upon! It is ONLY
- food for thought and seems worth mentioning.
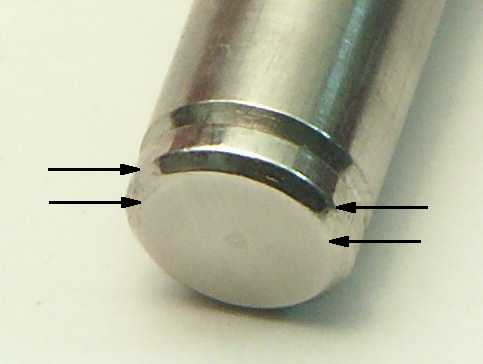
Look at the pics below - you will see the
end of the guide rod and the inside of the
end cap. Now, imagine if you try to insert
the assembly in to the slide end as I do -
by hand, no tools - it is necessarily starting
at an angle relative to the barrel and so
also, to that hole you are targeting in the
slide. This angle of approach then makes
the side of guide rod end nearest the barrel
press against the inside, complimentary surface,
of the end cap.
Of course, the guide rod end has a machined
chamfer but IMO each side of that chamfer
is still quite ''sharp'' - a crisp edge -
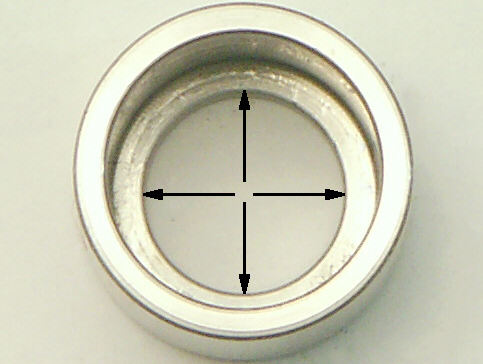
no criticism I might add. The inside of the
end cap does not have any discernible chamfer
- it seems a relatively sharp edge - no real
major reason that it should have any extra
machining - in theory!
My contention is - those ''sharp'' edges when
abutted at this angle of approach - tend to
snag - making it harder to get the guide rod
thru the end cap. That is where it ''hangs
up'' most times.
Now this process does not suddenly make the
recoil assembly a breeze to reinstall - it's
still a fiddle but I do think this helps just
ease the process and no metal is removed that
can be IMO in the least prejudicial - it is
probably hard to even measure! The arrows
in the pic's are there purely to make quite
sure you can identify the edges I am describing
smoothing, circumferentially. |
|
Step one
- is to wrap a small piece of 600 grit
emery paper round a small piece of flat
hardwood ..... and then apply both edges
of the guide rod chamfer (one at a time)
to the abrasive, rotating guide rod by
twirling in fingers to make process even.
Inspect to see a detectable ''polish''
shine, with some ''sharpness'' less obvious.
Now this will barely remove any metal
to speak off - what it will do is make
those chamfer edges the merest bit less
intense. Almost a polish, plus a bit!
Concentrate on the major diameter of the
chamfer (top arrows).
|
|
Now for
stage two - the end cap.
Be innovative here - I found a small
screwdriver which had a handle tapering
where the blade enters. I was able
to wrap some 600 grit round that, making
a sort of cone - insert whole deal into
rear of end cap - and then lightly rotate
cap on that formed abrasive sheet.
Do this a good few times. You will
not see a huge difference - it would
take high magnification to see a change
but IMO it takes off just a whisker
of sharp edge. A tapered piece of dowel
would do OK as a former - or, bound
to be something you can find in the
workshop.
|
|
Back to Top
|